When it comes to regular maintenance of a bolt action rifle. It is a good idea to know how to strip your bolt to access and clean the firing pin and the components that make it up.
The bolt of your rifle is where the magic happens, once the trigger is pulled and the hammer falls, what is known as “lock time” is all down to the bolt workings. Keeping these clean and well lubricated helps to ensure a quick lock time (the time taken from trigger release to the bullet being fired).
I will show you how to strip an Anschutz Super Match Bolt to it’s inner workings. This will enable you to clean the innards.
Step One. Remove the bolt from the rifle.

Anschutz bolt removed from rifle
Step Two. De-Cock the bolt.

Cocked Anschutz Rifle Bolt

De-Cocked Anschutz Rifle Bolt

De-Cocked Anschutz Rifle Bolt
Step Three. Unscrew the end cap. This will make a clicking sound as it is started to be unscrewed. Be careful as there is a spring retained by this under tension.

Unscrewing Anschutz Bolt End Cap

Unscrewed Anschutz Bolt End Cap
Step Four. Remove the spring by pulling out. The cocked indicator should come out with this.

Anschutz End Cap, Spring and Cocking Indicator
Step Five. Remove the inner collet by pulling it out.

Anschutz Bolt Inner Collet
Step Six. Remove the outer collet by pulling it out – there is slightly more resistance on this part than the inner collet.

Anschutz Bolt Outer Collet

Anschutz Bolt Outer Collet
Step Seven. Pull out the firing pin assembly.

Anschutz Firing Pin Removal

Anschutz Firing Pin Removal

Anschutz Firing Pin Removed
Step Eight. Remove the bolt handle by pulling upwards. This should be loose.

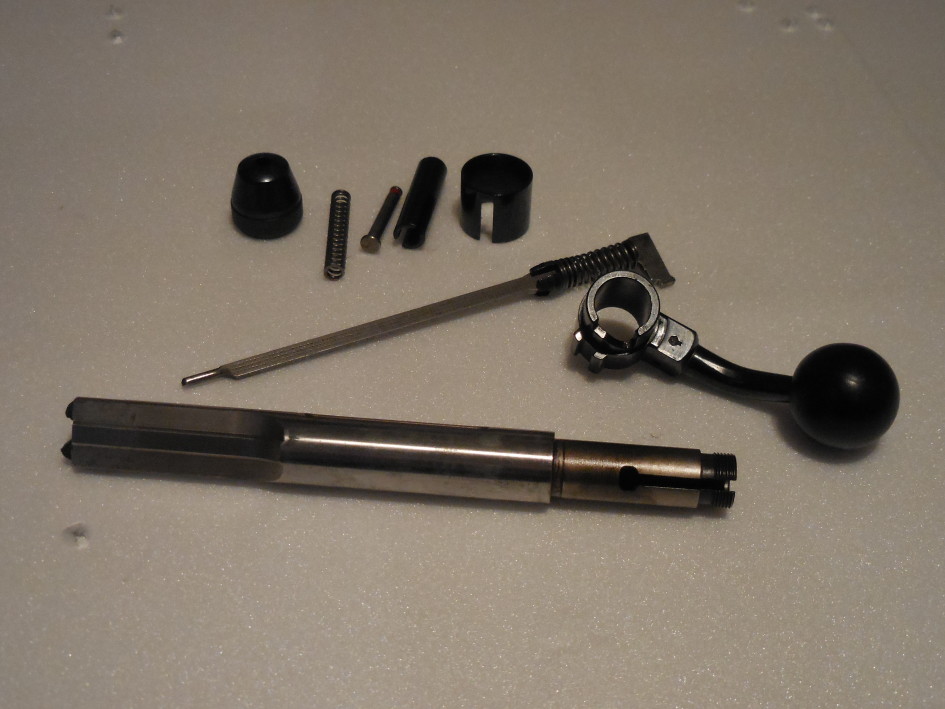
Anschutz Bolt Disassembled
Optional:
Removing the spring from the Firing pin assembly.
Hold the retainer firmly.

Anschutz Bolt Firing Pin Assembly Dismantling
Push towards the spring.

Anschutz Bolt Firing Pin Assembly Dismantling
Twist

Anschutz Bolt Firing Pin Assembly Dismantling
Release the spring. Be careful as this spring is under tension.

Anschutz Bolt Firing Pin Assembly Dismantling

Anschutz Bolt Firing Pin Assembly Dismantling

Anschutz Bolt Firing Pin Assembly Dismantled
Everything can then cleaned and oiled on the firing side.
I clean all parts then lightly oil all moving parts and contact points.
Re-assembly. Run through the steps in reverse until the bolt is back together. To re-cock the bolt You can use the paracord trick as outlined in the RPA Bolt Disassembly post however as this is a small-bore bolt, it is somewhat easier to cock and can be done with a firm grip on the bolt body and twisting the bolt handle. Using paracord does make this somewhat easier though.
As always, any questions, hit me up in the comments and I’ll reply shortly.
Ste Gough


3rd September 2017 at 3:56 am
I have never dismantled a bolt before so it was with some trepidation that I began the process, especially as I had been led to believe to be extremely careful of the spring under tension as it can advance from the bolt at such a rate that can make it difficult to locate !!
BUT following the excellent steps as provided I managed to dismantle replace and oil the relevant parts.The only error I made was to have the bolt upside down so that I was unable to cock and de cock, however on closer inspection of the photo provided I was able to ascertain my error, unscrew the end cap ,twist the bolt to its correct position re screw the end cap and HOO bleeding ray it now works perfectly.
Thanks a lot for your terrific education on this subject.
4th September 2017 at 8:58 am
Thanks for your feedback John.
It’s great to hear that someone has had the confidence to attempt to dismantle their bolt from my instructions. ~ I see the stats for the numbers of people who view my pages, but rarely someone gets in touch and lets me know that it’s been helpful, so thanks!
Happy to hear you’ve successfully put your bolt back together too, I find it to be very rewarding when you can work on your own rifles, and they still fire at the end!
Happy shooting!
Ste
14th March 2018 at 1:57 pm
How do you remove the extractor claw for cleaning
15th January 2019 at 6:14 pm
I have a Match 54 without bolt (lost !) and i want to try to make one on my lathe after buying the genuin firing pin set. Is someone having the whole dimensions of it to help me ?
With all my consideration, Philippe
15th January 2019 at 9:08 pm
Hi Philippe,
I imagine your best bet would be Anschutz directly, although I couldn’t imagine they’d give away this information freely.
I wouldn’t know where to begin with drawing an engineering diagram for the measurements you require, and even if I did know, I’m not sure it would be something I’d be comfortable making freely available on the internet for all, given all the possible variants of firearms law around the world.
Good luck with making the bolt, though! I hope you can find someone at a rifle club or similar that may be able to give you the information you need.
Ste Gough
25th July 2020 at 8:54 pm
Hi Ste
I have a Anschutz 54 action like yours. It is a unfinished project I bought.
It came without the loading platform. Is there any chance you can help me with some dimensions so I can make one?
Calvyn
14th March 2021 at 10:26 pm
I am getting light strikes with my Anschutz 54.18 MSR. Is it the large spring on the firing pin that is responsible for the light strikes or is it the smaller spring on the rear of the bolt?
I believe it is the larger one but I’m just trying to confirm it.
Thanks,
Ken
8th July 2021 at 4:25 pm
Your instructions are very helpful. The photos are an added bonus. I was able to dissemble and re-assemble with no problem. Thanks
28th June 2024 at 7:53 pm
Excellent instructions, this made an easy task of disassembly, cleaning & lubricating the bolt.
29th June 2024 at 2:20 pm
Glad this article is still proving useful! Thanks for the feedback!
4th September 2025 at 10:45 pm
Do you have any experience with bolt shims on this 54 bolt ? I have this same bolt and I am not sure where the shim goes (in front of the handle ?)