Whilst cleaning my RPA ranger (RPA Quadlite Actioned Target Rifle) I decided to take the bolt apart for the first time. I’d not done this before on this rifle, and decided to look on the web for a manual or walk through to make sure that I didn’t break anything whilst dismantling, or come across anything which may stop me putting it back together. My search however was fruitless, so hopefully with my blog you’ll have found what you’re looking for if you’re in the same position.
Turns out, it’s really simple.

RPA Quadlite Bolt
We can see that the bolt starts in the cocked position. Unless you have a de-cocking tool / bolt holder, this will be how you will see your bolt out of the rifle.

Cocked Bolt – RPA Quadlite

Pin Back – RPA Quadlite Bolt
First things first we’re going to want to unscrew the end piece of the bolt.

Unscrewing End Cap – RPA Quadlite Bolt
This is not too difficult and is not torqued hard enough that you need any tools for this.

Unscrewing End Cap – RPA Quadlite Bolt
Then I had a washer fall out, there is a washer and bearing in this bolt. They look like this.

RPA Quadlite Bolt Washer / Bearing
This is also the orientation and order that they are assembled.

RPA Bolt Washer/Bearing Assembly

RPA Bolt Washer/Bearing Assembly
These were then cleaned and set to one side whilst I tackled the most intricate part of stripping the bolt.
We can see that there is a groove and a circle, we push the cocking mechanism to the top, ensuring that the outer sleeve stays put.

Firing Pin Removal RPA Quadlite

Firing Pin Removal RPA Quadlite
We then grab the inner ring and pull it north until it stops. Once in position take the outer ring and pull it to the top also.

Firing Pin Removal RPA Quadlite
Amendment; Thanks to Richard Utting of SharpshootingUK: It’s worth marking the cocking mechanism at this point so we know which way is forward. This was not as pertinent on my rifle, probably due to the few number of shots, but following reading this article and stripping Richards RPA bolt, he noticed that the wear on this cocking mechanism had always been on one side, which polished the part and made it much smoother to operate when replaced the same way round as it was when it was removed.
Thanks for the heads up Richard.
Then we twist the cocking mechanism through 90 degrees.

Firing Pin Removal RPA Quadlite
And simply pull it out.

Firing Pin Removal RPA Quadlite
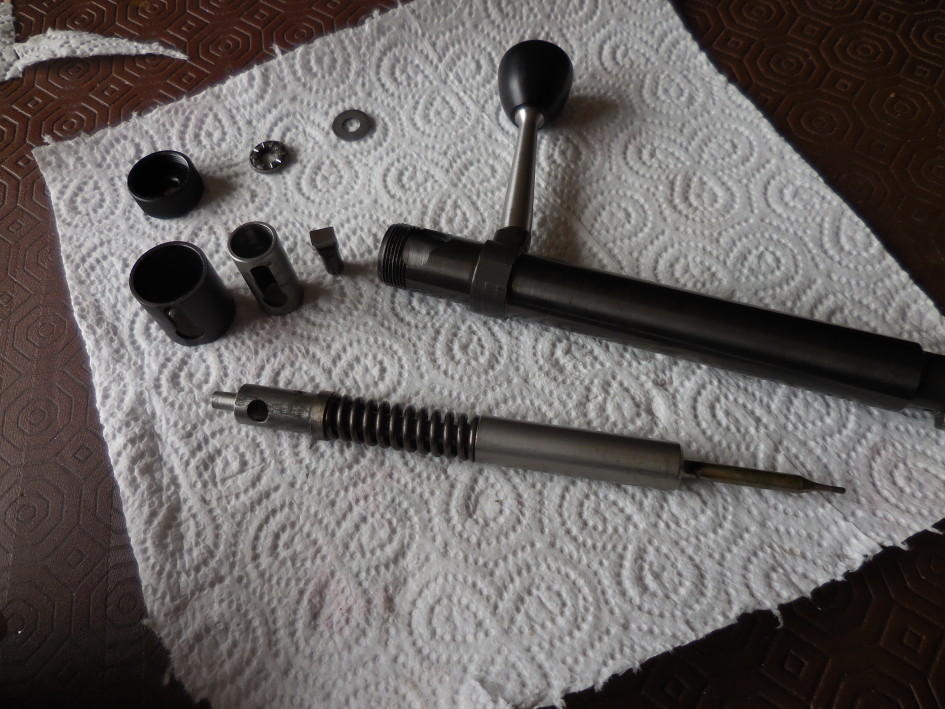
We can then remove the firing pin and the rest of the pieces. Which will look like this:

RPA Quadlite Bolt Internals

RPA Quadlite Bolt Internals
At which point everything is cleaned and polished as the firing pin was a little dirty. All old oil was removed using kitchen roll (paper towel) and lightly oiled.

Dirty Firing Pin – RPA Quadlite Bolt

Dirty Firing Pin – RPA Quadlite Bolt

Cleaned Firing Pin – RPA Quadlite

Cleaned Firing Pin – RPA Quadlite

Cleaned Firing Pin – RPA Quadlite
Reassembly as you can imagine is as simple as reversing this procedure and keeping the parts lined up and oriented the same was in which they were disassembled.
The hardest part of reassembly is re-cocking the bolt.
A trick I learned from a mishap at Bisley and some tutorials on youtube for Remington 700 bolts is to use a loop of para cord (or shoelace) and stand on it whilst looping it around the cocking mechanism on the bolt, then pulling in the direction needed to cock the bolt. It looks like this.

Cocking a De-cocked RPA Quadlite Bolt
You will need to pull very hard, aaaand Voila. One cleaned and re-assembled bolt.
Cocked Bolt – RPA Quadlite
Any questions, just leave a comment and I’ll get back to you as soon as possible.
Hope this post helps
Ste Gough


6th March 2016 at 6:50 pm
Many thanks for putting up this article.
I just used it to clean my 2 quadlite actions and very helpful it was.
6th March 2016 at 9:28 pm
You are quite welcome, thanks for the feedback. Glad to be of help 🙂
13th July 2018 at 8:59 pm
great article for anyone to have . but can anyone let me know where to find a .223 mag for the rpa or have any contacts for one.
3rd September 2018 at 1:06 pm
Have you tried contacting RPA direct? I know Michael Markham at RPA was quite helpful when I got in touch.
8th February 2022 at 11:38 am
Thank you for putting up this article. Very HELPFUL.